Данный модуль позволяет добавлять товарам неограниченное количество спецификаций. Спецификации - любая информация о товаре, которая может быть интересна покупателю. Спецификации могут использоваться для:
Вывода списка характеристик товара на странице карточки товара. Возможна разбивка на группы спецификаций, например группы: Память, Экран, спецификации: HDD, Ram, Разрешение экрана, Размер экрана и т.д.
Установки фильтров, с помощью которых покупатель может смотреть товары с заданными параметрами. К примеру, смотреть мониторы диагональю 19 дюймов, фильтрация возможна по любым параметрам, Вы сами настраиваете свои фильтры. Фильтры - важнейшая часть магазина, которая помогает покупателю найти товар, который он хочет купить.
Все спецификации могут группироваться и добавляться к любой категории товара, либо к нескольким категориям сразу. Это позволяет точно и быстро находить покупателю именно тот товар, что ему нужен. Модуль спецификаций и фильтров обладает максимальной гибкостью.
Схема работы модуля представлена на рис. 1.
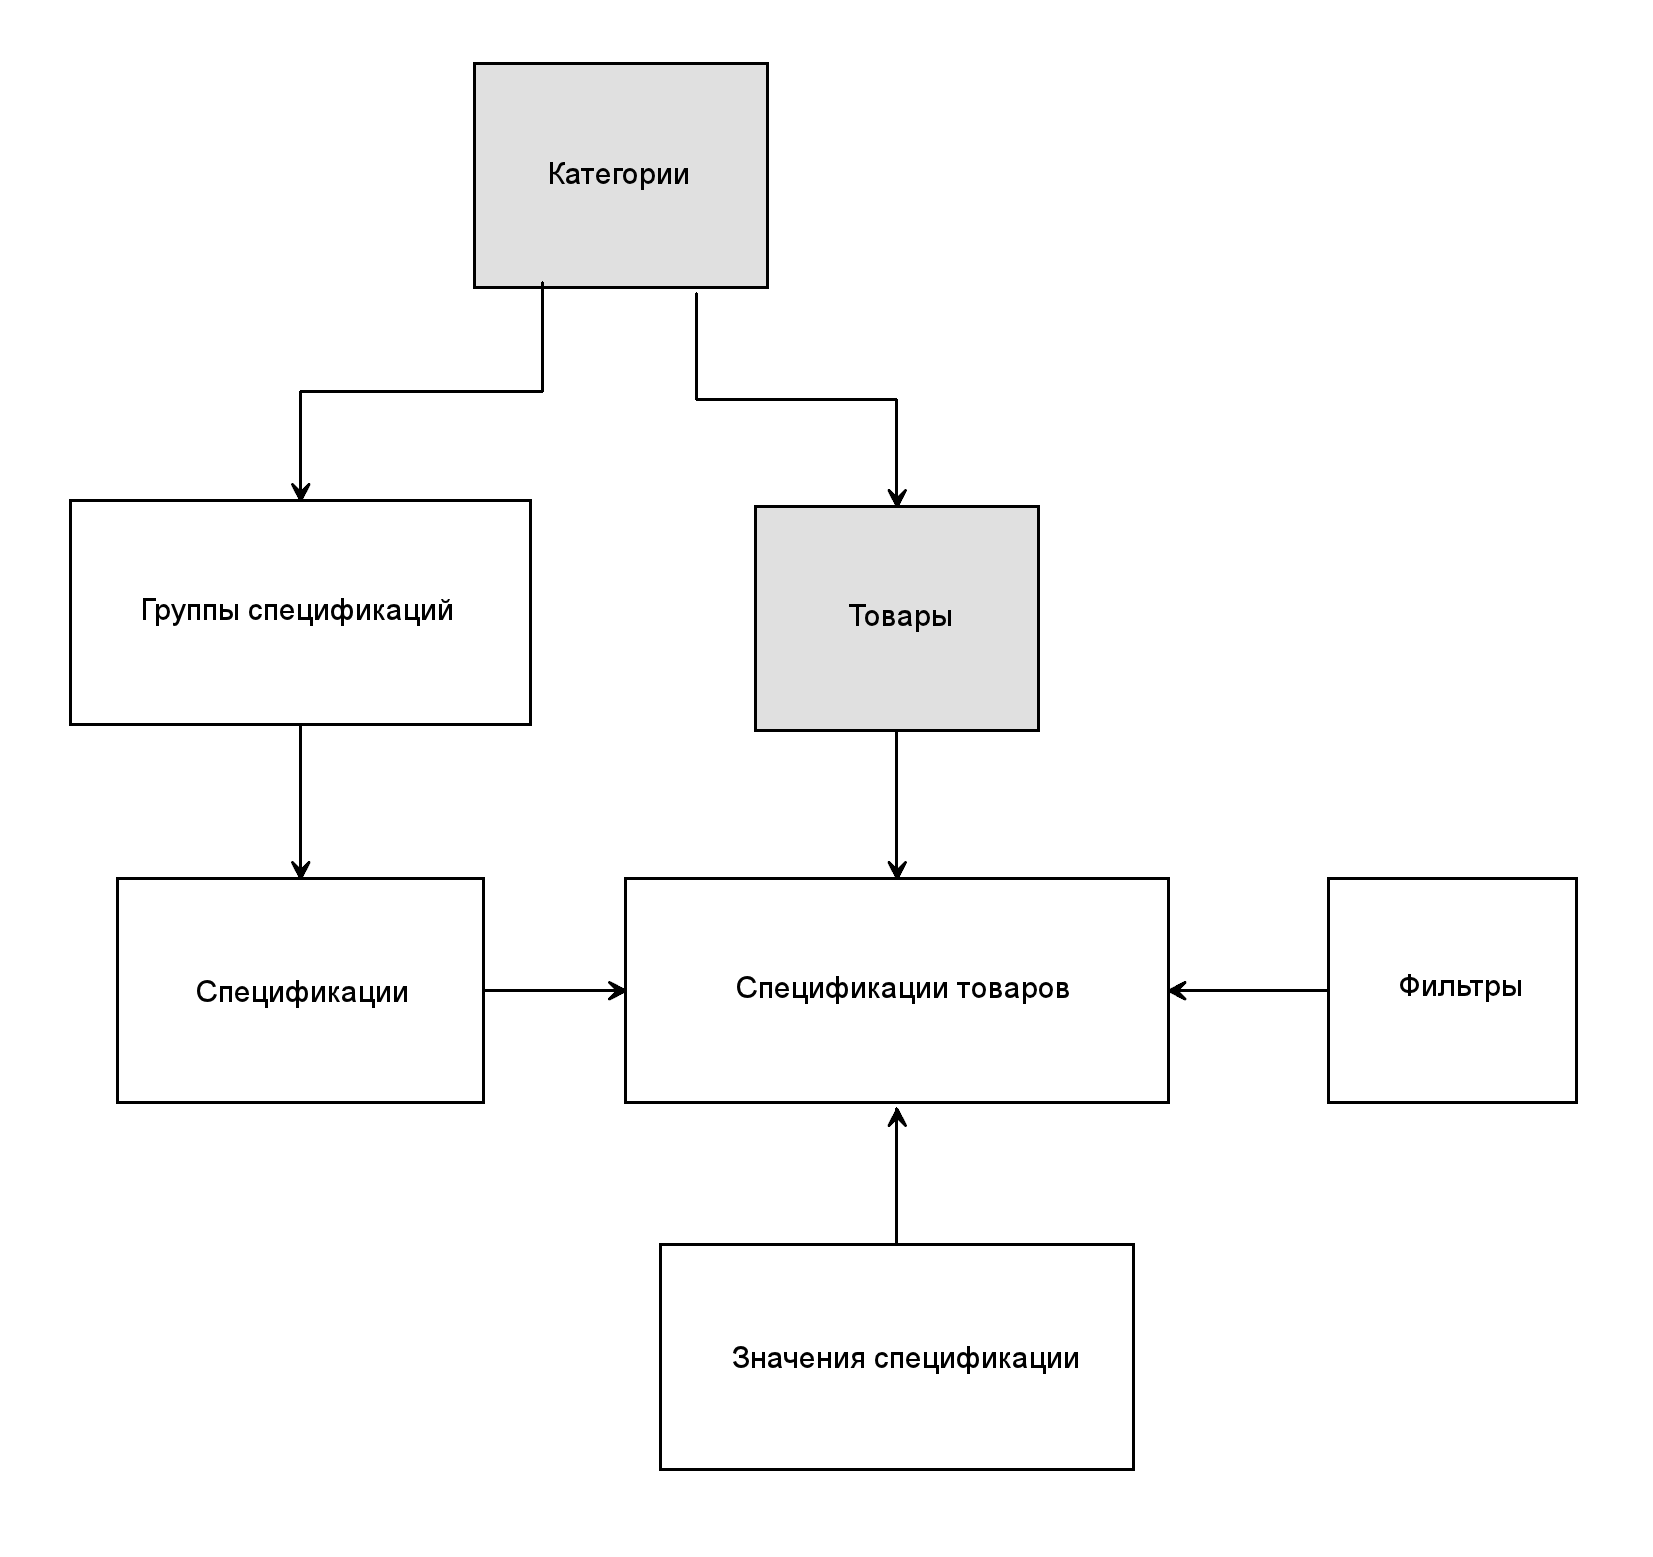
Рис. 1.
Схема базы данных модуля представлена на рис. 2.
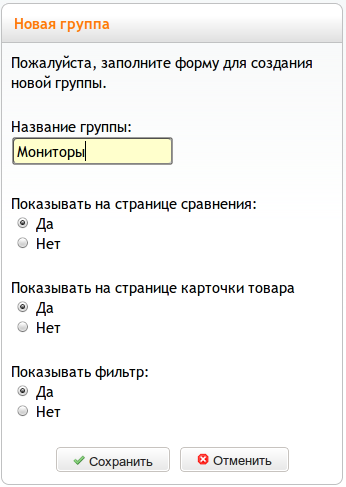
Рис. 2.
Фильтр
Фильтры используются для выбора (фильтрации) товаров, соответствующих заданным значениями спецификации. Можно применять один и более фильтров к выбранному списку товара.
Спецификация товара
Значение спецификации для выбранного товара.
Спецификация
Новое поле, добавляемое к товару, новая характеристика товара.
Группа спецификации
Произвольная группа спецификаций. Группы используются для связи спецификаций с одной или несколькими категориями товара.
Product Specifications are the key to this software. Think of them as similar to existing parameters of your products, like Price and Weight, but much more flexible. The key to setting up and using this software is the correct selection of the Specifications.
What data concerning your products can be easily summarized in a list on the Product Info page? If your product data normally includes a list of specifications, these would be ideal to use here.
What data would be useful to your customers in a Product Comparison? This is usually a subset of the specifications associated with your product. Which of these are customers likely to consider important? Which specifications distinguish one product from another product in the same category?
What data might your customers be looking for a specific value or range of values? This can be specific values that your customer might be interested in, a range of values, values beginning with a letter or number, and much more. See the Filters section for a list of ways these values can be used.
Once you have your Specifications set up, Product Specifications are entered from the New/Edit Product page in your Admin. You will find new entry fields for each applicable Specification right after the Product Description field.
Specifications define the data that can be used to describe your product. Think of them as generic versions of the data that osCommerce already associates with your product, such as Price, Weight, or Description. The difference here is that Product Specifications are not already defined by osCommerce; you need to define what these data fields mean. The Specification is what defines this data and determines how and where it is used.
Consider what specifications you would like to display or use with your products. You will probably need to create Specifications that are relevant to each Category or group of products in your store. For example, you would need a different set of specifications for keyboards than you would need for printers. You may also need a group of Specifications to display on the Product Info page, a subset of these Specifications to show in a Product Comparison page, and a different subset to use as Filters. If your site is complex or you have a large number of products, start making lists of Specifications and where you want to use them.
Most Specifications will contain new data that you enter, but there is also a capability to use the existing data from your products as Specifications. For example, you can have the price data used as a specification so that you can show it as a column on the Comparison page. Similar existing data fields can also be useful as Filters.
Specification groups are collections of specifications that are used in a related manner. You may have one or many specifications in a group. The group can be composed of specifications that you want to show on the Product Info page, that you want to use in the Product Comparison table, that you want to use as filters, or any combination of the above.
Specification groups are linked to one or more product categories. You can have a group linked to only one category, so that the specifications in it show only in that category. You can have your group linked to several related categories. You can even have it linked to all categories, so the specifications in it can be used throughout your store.
This allows you to limit the scope of specifications to the areas where they apply. A Specification Group may contain one Specification or many. This allows you to tailor your Specifications to work with the structure of your categories and products.
Keep in mind that multiple Specification Groups can apply to a single product or appear in a single page. It's up to you to design the coverage of these groups to match your store's design and to make it easy to maintain. The idea is to make each Group and it's included Specification(s) cover as many products as possible. If you find yourself duplicating a Group or a Specification in that group, you should probably change the scope of the Group instead, or move the Specification to a new/different Group.
When you set up your Specification Groups, think of the Specifications you plan to put in them and where they will be used. For example, you may want to have a group that includes only a Price specification that will be used as a filter throughout your site. Will one set of filter values work for all of your product categories, or will you need different price ranges for categories that have product of lesser or greater than average price? You may want to set up more than one group for this filter.
You should also consider one Group to contain most of the specifications that apply to each group of products. Grouping all of the Specifications that apply to a specific category of products will make them easier to manage.
This is probably the hardest part of setting up Product Specifications. Once you've got your Groups and the Specifications they contain figured out, everything else will start to fall into place.
You can set up a limited set of values that you can select from when entering the data for each Product Specification. This eliminates data entry errors that will ruin your filter results and mess up the display of your Product Specification data, and serves as a reminder of what needs to be entered for that Specification. It is also the only way for multiple values to be set for a given Product Specification. This is best used where the possible values that a Specification can take are limited and known in advance.
Specifications can also have Filters attached. Filters allows your customers to view a list of your products that matches the filters that they select. This gives much finer control than a search, so your customers see better results. Filters have the scope of the Specification that they are compared against, so setting up the Specification Groups and the Specifications they contain is the first step to using Filters.
The key to setting up Filters is to select the correct Filter Class and Display Method. Don't use more than one or two Display Methods in your store to avoid confusing your customers. Choose the type to match the data and the way you think your customers will want to look for products. For example, colors can be selected by name through a menu, but color samples as images might be more appealing to your customers.
You should have exactly the same Filter values as you have in your Product Specification if you are doing an Exact match between the Specification and the Filter. For other Filter Classes the values should probably be different. For example, the Filter values for the Range class need to be the maximum value for each Range, which may not correspond to any Product Specification value.
See Table 1 for the acceptable combinations of Filter Class and Display, and 4.2.2.1 for more detailed information on how each Filter Class works.
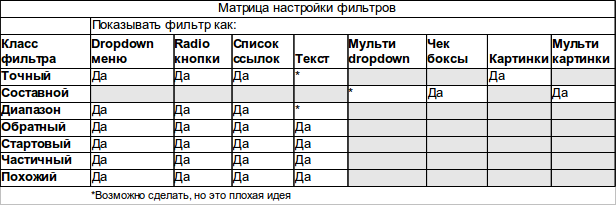
Рис. 3.
This section provides a detailed reference for every option and selection added by this software.
4.2 Catalog Panel The catalog panel is located in your store Admin under Catalog Products Specifications. This is where most of the setup is done. The initial page is shown in Figure 3.
рисунок 3
4.2.1 Specification Groups
Specification Groups contain one or more Specifications and are linked to one or more Categories.
4.2.1.1 Create a Specification Group
Click on the new specification group button to create a new group. The form fields are:
Group Name: Give your specification group a name. This name is only used to identify this group in your admin, so make the name whatever will remind you of what is in this group.
Show Comparison Page: Show this group on the Product Comparison page. This allows you to turn the entire group off if it's not something you want to see in the Product Comparison. You can also do this at the individual specification level if you prefer.
Show on Products Info Page: Show this group on the Product Info page.
Show Filter: Show this group in the Filters box.
Use in Feeder: Use this group to output a feeder file.
Click the save button when you are finished. Repeat these steps for as many specification groups as you want.
4.2.1.2 Edit a Specification Group
If you need to make changes, click on the name of the Specification group to highlight it and click the edit button. The editing process is the same as in 3.3.1 above.
If you only need to change the Show Comparison Page, Show on Products Info Page, or Show Filter settings, you can do that by clicking on the red or green light under the appropriate heading.
4.2.1.3 Delete a Specification Group
Click on the name of the Specification group to highlight it and click the delete button, then click delete again. Note that this permanently deletes the group and any specifications, product data, filters, and specification values attached to this group. Warning: Backup your database before doing a large delete, just in case you want some of that data back later.
4.2.1.4 Copy a Specification Group
Click on the name of the Specification group to highlight it and click the copy button. You have the choice of copying any specifications, product data, filters, and specification values attached to this group by checking the appropriate box(es). It would be a good idea to change the name of the group if nothing else. If you want to make this exact Specification Group apply to another Category, use Link to a Product Category below instead.
4.2.1.5 Link to a Product Category
This allows you to link your specification group to one or more product categories. Highlight your group, click the link button, and select the product category that you want to link it to. You can repeat this operation for as many product categories as you want to link to.
4.2.1.6 Link to all Product Categories
This allows you to link your specification group to all of the product categories in your store. Highlight your group and click the link all button. This will not duplicate links if you already have categories linked from this group.
Hint: If you want to link to most of your categories but not all of them, it may be quicker to use link all and then unlink the ones you don't want.
4.2.1.7 Unlink a Product Category
This is the delete function for links. Highlight your group, click the unlink button, and select the product category that you want to remove the link to. You can repeat this operation for as many product categories as you want to remove.
4.2.1.8 Unlink all Product Categories
This allows you to delete the link from your specification group to all product categories that it is currently linked to. Highlight your group and click the unlink all button.
4.2.2 Specifications
To see a list of Specifications in this Specification Group, click on the yellow file icon to the left of the name of your Specification Group. This brings you to the Specifications window.
4.2.2.1 Create a New Specification
The first step is to create your first Specification in this Group. Click on the new specification button to get started. This brings up a form that allows you to set the following:
Specification Name: Give your specification a name. This name is used throughout the catalog side of your store to identify this specification. You will need to enter this name for each of the languages in your store.
Specification Description: Give your specification some descriptive text. This is currently used only on the Products admin page as instructions or hints on entering the data there. You need only enter this text in the box for your store's admin language, unless your admin needs more than one language.
Specification Prefix: This allows you to specify text that will appear just before your specification data.
Specification Suffix: This allows you to specify text that will appear just after your specification data (and optionally in the header of the Comparison Table.) This should always be used for units of measure. Hint: It's a good idea to keep your data as clean as possible. If there is any part of a specification that is repeated every time the specification is seen, that text should be stored in a Prefix or Suffix. This makes your data easier to enter and manage, and it makes filters work properly on the real data.
Sort Order: It's usually important to present your specifications in a specific order (and it's essential for most filter types.) Use numbers here to arrange your Specifications. I prefer to skip a few numbers between each entry, just in case I need to add a new value in between later. Also see the Sort button under the Edit Specifications section below.
Justification: This is used to present your data correctly. The standard is for text to be Left justified, images to be Centered, and numbers to be Right justified. Use whatever looks good to you in your application.
Use Existing Database Field: This allows you to use the data entered in other Product data fields. This is useful for columns in the Comparison table and for Filters. The choices are pulled from your store's products and products_description database tables, plus a couple of special options. The normal values are:
None. You will be prompted to enter the data for each product that this Specification applies to. Combination. This is a special field that is set up in the Configuration panel. See 4.1.11 through 4.1.17 for setup details. This should only be used in the Comparison table.
Buy Now - Show the Buy Now button.
Products Quantity - Show the Quantity for this product.
Products Model - Show the model.
Products Image - Show the image (Small image size)
Products Price - Show the price.
Products Weight - Show the weight.
Manufacturer - Show the manufacturer's name.
Products Name - Show the name of the product.
Show Comparison Page: Show this Specification on the Product Comparison page. This allows you to turn the specification off if it's not something you want to see in the Product Comparison. You can also do this at the specification group level if you prefer.
Show on Products Info Page: Show this Specification on the Product Info page.
Show Filter: Show this Specification in the Filters box.
Filter Class: This determines how the filter data is applied. The options should allow you to tailor a filter to just about any need. The classes are:
No Filter. This specification will not be used with a filter. You will not be able to add filter data to this specification.
Exact. This filter performs an exact match between the filter and the product specification. Probably the most common use. Examples: Manufacturer, Model.
Multiple. This is an exact match, but the customer may select more than one item to match. This can be implemented as a multiselect pulldown or a set of checkboxes. Examples: Colors, Styles.
Range. This matches all values in the selected range. Examples: Price $100-$200, Processor Speed 2-4GHz..
Reverse. This is the Range class in reverse. The customer would select a single item, but the products have a range of values, so any products that include the customer's selection in their range would show up. Example: I select the model year 1996 for my truck, and get a part that fits 1995-2000 models.
Start: This performs a partial match on the first part of the Specification data. The customer selects a single string and gets all products that start with that string. Example: The customer selects A and gets all books whose title starts with A.
Partial. This performs a partial match on any part of the data: It's the same as Start except the string can be anywhere in the data.
Example: The customer enters part of an author's name and gets all authors whose name contains that string. Note that this is similar to a search, except we are limiting it to a single specification and not the general product description. Like. This uses a Soundex filter to match words that sound similar. This could be used in place of the Partial class for better (?) results for searches where customers can't spell. From looking at my search logs, that's most of them.
Filter Show All: This adds an All option to the set of filters. It allows your customer to back up when this filter doesn't return the results that they want.
Display the Filter as: This controls the way that your filters are displayed to your customer. To avoid confusing your customers, use only one or two of these for any group of filters that will be seen together. The choices are:
None. This Specification will not be used as a filter.
Pulldown. The filter values will be presented in a standard pulldown box. Only one option can be selected. The filter will execute as soon as an option is selected unless Javascript is disabled, in which case a button will be provided to submit the filter.
Radio Buttons. The filters will be presented as a series of buttons. Only one option can be selected. The filter will execute as soon as a button is clicked unless Javascript is disabled, in which case a button will be provided to submit the filter.
List of Links. The filters will be presented as standard links. Only one option can be selected. The filter will submit as soon as a link is clicked.
Text box. The customer can enter any valid text. The entered text is scrubbed to remove any control characters or special characters that would interfere with the results. This should be used only with filter classes that can tolerate incorrect filter data. A button will be provided to submit the filter.
Multi-Pulldown. Similar to a pulldown box, but the customer can select multiple filters from the list. This type should generally be avoided as it is confusing to customers.
Check Boxes. The filters will be presented as a series of check boxes. Any number of options can be selected. A button will be provided to submit the filter.
Images. The filters will be presented as a series of images. Only one image can be selected. The filter will execute as soon as an image is clicked unless Javascript is disabled, in which case a button will be provided to submit the filter.
Multi-image. The filters will be presented as a series of images. Any number of images can be selected. A button will be provided to submit the filter.
Enter Specification Values as: This controls the way the Specification data is entered in the Admin Products page. You can use this to limit the data to specific values and to eliminate typos that would ruin Filters and Comparisons. NOTE: Use of one of the multi-select types here is the only way to enter multiple values for a single product. The choices are:
Text Box. This is the default text entry field. Any value may be entered, but only one value per Specification per Product. Warning: A Text Box will also be shown if any other type is selected but no Specification Values are entered.
Pulldown. The Specification values will be presented in a standard pulldown box.
Radio Buttons. The Specification values will be presented as a series of buttons.
Multi-Pulldown. Similar to a pulldown box, but you can select multiple Specification values from the list for a single product. Avoid this type unless the person entering data is well trained on how to use it.
Check Boxes. The Specification values will be presented as a series of check boxes. Any number of options can be selected for a single product.
Image. Similar to Radio Buttons, except there will be images instead of text. Only one image can be selected.
Multi-image. Similar to Check Boxes, except there will be images instead of text. Any number of options can be selected. Click the save button when you are finished. Repeat these steps for as many specifications as you want.
4.2.2.2 Edit a Specification
If you need to make changes, click on the name of the Specification to highlight it and click the edit button. The editing process is the same as in 3.3.2.1 above.
4.2.2.3 Delete a Specification
Click on the name of the Specification to highlight it and click the delete button, then click delete again. Note that this permanently deletes the specification and any product data, filters, and specification values attached to this Specification.
Warning: Backup your database before doing a large delete, just in case you want some of that data back later.
4.2.2.4 Copy a Specification
Click on the name of the Specification to highlight it and click the copy button Select the new Specification Group that you want to copy to and click the copy button. This will create an exact copy of this specification and any product data, filters, and specification values attached to it. It would be a good idea to change the name of the Specification copy after doing this. If you want an exact copy of a Specification, you should probably change the scope of the Specification Group it belongs to instead, or move it to a different Group.
4.2.2.5 Move a Specification
Click on the name of the Specification to highlight it and click the move button Select the new Specification Group that you want to move this Specification to and click the move button. This will move this specification and any product data, filters, and specification values attached to it.
4.2.2.6 Working with Another Specification Group
Once you have added all of the Specifications that you want in this group, click on the back button to go back to the Specification Group page.
4.2.3 Filters
Filters are used to create a custom selection of products based on the filter criteria..
To start, click on the yellow file icon to the left of the name of your Specification. This brings you to the Filters window. NOTE: You will only be able to see the icon if the Specification and the Specification Group it is in have Show in Filter set to True (Green) and Filter Class and Display the Filter as in the Specification are set to something other than None.
4.2.3.1 Create a New Filter
The first step is to create your first Filter in this Group. Click on the new filter button to get started. This brings up a form that allows you to set the following:
Filter: Give your Filter a name. This name is used throughout the catalog side of your store to identify this Filter. You will need to enter this name for each of the languages in your store.
Filter Sort Order: Most filters must be presented in the proper order to work correctly, or so that customers can easily find the correct filter. Hint: Skip a few numbers between each Filter to allow room for future Filters to be added. Warning: Giving two or more Filters the same number, or failing to give them a number, will cause some of your filters to disappear. Repeat this process as many times as you need to add all of the filters for this Specification.
4.2.3.2 Edit a Filter
If you need to make changes, click on the name of the Filter to highlight it and click the edit button. The editing process is the same as in 3.3.3.1 above with one exception: the Sort button. The Sort button will sort all of the filters in this Specification in alphanumeric order. Note: This won't work well for things like colors that are not inherently alphanumeric in order. It's mostly useful for long imported lists.
4.2.3.3 Delete a Filter
Click on the name of the Filter to highlight it and click the delete button, then click delete again. This permanently deletes the Filter.
4.2.3.4 Copy a Filter
Click on the name of the Filter to highlight it and click the copy button Select the new Specification that you want to copy this Filter to and click the copy button.
4.2.3.5 Move a Filter
Click on the name of the Filter to highlight it and click the move button Select the new Specification that you want to move this Filter to and click the move button.
4.2.3.6 Working with Another Specification
Once you have added all of the Filters that you want in this Specification, click on the back button to go back to the Specification page.
4.2.4 Specification Values
Specification Values are used to set the values that a Specification may have. They will appear in a selection menu on the Admin Products page..
To start, click on the blue file icon to the left of the name of your Specification. This brings you to the Specification Values window.
NOTE: You will only be able to see the icon if the Specification has Enter Specification Values as: set to something other than Text Box.
4.2.4.1 Create a New Specification Value
The first step is to create your first Specification Value for this Specification. Click on the new value button to get started. This brings up a form that allows you to set the following:
Specification Value: Give your Specification Value a value. This value is only used in the Admin Products menu as a value to be selected for this Specification.
Specification Value Sort Order: It will be easier to enter product data if your Specification Values are in the proper order. Hint: Skip a few numbers between each Value to allow room for future Values to be added. Warning: Giving two or more Values the same number, or failing to give them a number, will cause some of your values to disappear.
Repeat this process as many times as you need to add all of the Specification Values for this Specification.
4.2.4.2 Edit a Specification Value
If you need to make changes, click on the name of the Specification Values to highlight it and click the edit button. The editing process is the same as the New Specification Value process above.
4.2.4.3 Delete a Specification Value
Click on the name of the Specification Value to highlight it and click the delete button, then click delete again. Note that this permanently deletes the Specification Value.
4.2.4.4 Copy a Specification Value
Click on the name of the Specification Value to highlight it and click the copy button Select the new Specification that you want to copy this Specification Value to and click the copy button.
4.2.4.5 Move a Specification Value
Click on the name of the Specification Value to highlight it and click the move button Select the new Specification that you want to move this Specification Value to and click the move button.
4.2.4.6 Working with Another Specification
Once you have added all of the Specification Values that you want in this Specification, click on the back button to go back to the Specification page.
4.3 Products Panel
The Products panel is located in your store Admin under Catalog Categories / Products. This is your normal page for entering Products and Categories. There will now be some new fields in the Product pages, depending on how you have set up your Specifications.
4.3.1 Use Existing Database Field:
Any Specification that has this set won't show up as a new Product Specification field. There's already a place on this page to enter that information.
4.3.2 Product Specification Field.
Most of your new Product Specifications will show up as a new data field in your Products panel. They may be simple text boxes or any other data entry field type, depending on how you set them up in your Specifications. The new fields are grouped together, just after the Product Description fields. If you have Spec Box Frame Style set to Tabs, these fields will be shown when you click the Specifications tab.
NOTE: Since the Product Specifications are generic, you will need to enter a value for each language in your store, even if your data is numeric.
4.4 Filters Box
The filters box setup is in the box modules area with the rest of your boxes. Go to your store Admin under Modules Boxes, click on the Install button, then set the following fields to suit your needs. Note: There is also a filters module that appears in the center part of the page, if you want your filters to show there instead of in a column.
4.4.1 Enable Filter Box Module
Turns the box on and off. Note that the box will not show even if it is turned on here if there is not at least one valid filter to show. Values are restricted to True or False.
4.4.2 Content Placement
Show the box in the left or right column. Values are restricted to Left Column or Right Column.
4.4.3 Sort Order
Sets the position of the box in whichever column was selected above. Leaving this set to zero may cause problems with the column display.
4.4.4 Minimum Spec Filter
Sets the minimum number of filters needed for the box to show up. This means valid filters that would select products in the current category, so just having this many filters will not necessarily cause the box to show.
4.4.5 Filter Show Count
Show the number of products that the filter would return. Like the product counts in the categories box, this uses a lot of database resources. It may not be practical to show counts in a large store.
4.4.6 Filter No Result
What to show for a filter that would return no result. Normal looks like a standard filter but cannot be clicked. Grey leaves the filter greyed out so that it can still be seen but cannot be clicked. The appearance of the greyed―out filters can be changed in the stylesheet (see 4.5.1.5.) None removes the filter from the list.
4.5 Stylesheets
There are additions to the stylesheets in both the Catalog and Admin sides. These allow formatting of some of the new elements added by this software.
4.5.1 Catalog Stylesheet
The catalog side stylesheet is at catalog/stylesheet.css. If you are using the Tabs interface in your Product Info page, there are additional stylesheet selections in catalog/style_tabs.css. See 4.4.2 below for those styles.
4.5.1.1 ul.specification_box
The ul.specification_box class styles the list of Specifications on the Product Info page, and on the Admin side for the Product Preview. The default just increases the line spacing a bit. You can add your own styles to modify this list. Changes should be made to both stylesheets to keep the Preview looking like the real Product page.
4.5.1.2 option, optgroup
The option, optgroup settings style the options for the pulldown, radio, and checkbox selections. optgroup is used for disabled selections, to prevent the customer from selecting them.
4.5.1.3 img.image_filter
The img.image_filter class sets the appearance of images used as filters. Each property is described in the stylesheet file. Changes should be made to both stylesheets to keep the Admin images looking like the Filter images.
4.5.1.4 filter_count
This styles the product count numbers after the filter, if these are enabled. The default simply turns off the font styling of the selects.
4.5.1.5 no_results
This styles the "greyed―out" selections that are disabled, if that option is selected. The default is set to, well, grey.
4.5.1.6 close
This styles the [X] used as a close box for Filters in the Breadcrumbs, if that option is selected. The default is 75% of the Breadcrumb height and raised four pixels above the baseline.
4.5.1.7 img.image_filter
This is used to style the images used as filters. The properties are explained in the comments in the stylesheet.
4.5.1.8 specs_box
This is used to style the table surrounding the Specification box (or Tabs) on the Product Info page. The main use is to set the width of the box.
4.5.1.9 variantsBlock
This is used to style the box containing the Product Options in the alternate product_info.php in the Extras folder. The default is not used.
4.5.1.10 variantsBlockTitle
This is used to style the title of the Product Options in the alternate product_info.php in the Extras folder. The default sets the font and size.
4.5.1.11 variantsBlockData
This is used to style the data in the Product Options in the alternate product_info.php in the Extras folder. The default only sets the alignment.
4.5.1.12 productInfoKey
This is used to style the Price label in the alternate product_info.php in the Extras folder. The default sets the font and size.
4.5.1.13 productInfoValue
This is used to style the Price text in the alternate product_info.php in the Extras folder. The default sets the font and alignment.
4.5.1.14 productInfoPrice
This is used to style the Price in the alternate product_info.php in the Extras folder. The default sets the font and alignment.
4.5.2 Admin Stylesheet
The catalog side stylesheet is at catalog/admin/includes/stylesheet.css. If you are using the Tabs interface in your Product Info page, there are additional stylesheet selections in catalog/admin/includes/style_tabs.css. See 4.4.4 below for those styles.
4.5.2.1 iul.specification_box
This is the same as 4.4.1.1 above. It should be kept the same to keep the Preview looking the same as the Product Info page.
4.5.2.2 img.image_filter
This is the same as 4.4.1.3 above. It should be kept the same to keep the Preview looking the same as the Product Info page.
4.5.2.3 image_box
This is used in the Admin only to provide formatting for the Image select box. Each property is described in the stylesheet file.
Note: This styles the box outside the img.image_filter shown above.